The Basics
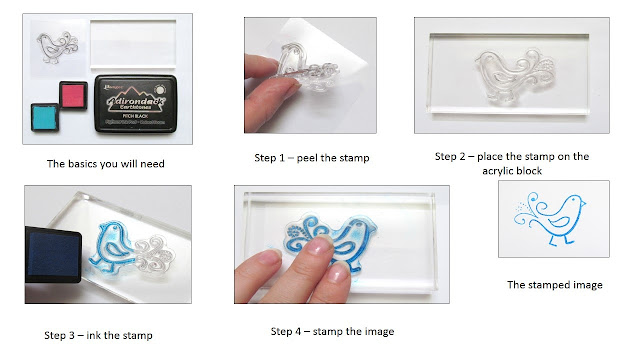
Clear stamps come on sheets of (usually) clear plastic which they are 'clung' to with the flat side of the stamp on the sheet. If you are going to use them you will need an acrylic block to stick the stamps to so they are easy to use and stamp an even image. You will also need an ink pad (or if you're like me one for every colour you know exists).How to use them
1. Peel a stamp from the sheet. If you're peeling one off a new sheet it's usually fairly well stuck so you might need to pull a bit. The stamps do stretch but be careful not to pull too hard as they can also snap.
2. Put the flat side of the stamp onto the acrylic block. It will 'cling' in place.
3. Now you need to ink the stamp. Always take the ink pad and tap it on the stamp. If you press the stamp onto the ink pad it 'floods' with ink and will make a messy image. Tap the pad onto the stamp enough to cover the stamp but not to 'flood' it.
4. a .You're ready to stamp the image. A great advantage of clear stamps is that you can see where you're going to stamp so use this to make sure you have the stamp straight.
b. Press the inked up side onto whatever paper you want the image stamped on, press firmly enough so the ink will transfer but not too hard as it will squash the stamp and blur the image. Make sure you use even pressure across the stamp.
And there you have it! A stamped image! (Don't worry if it's uneven or smudged, just have another go - I don't always get a clean image.)
Playing With Stamps
Restamping
This is where you stamp the same image again without re-inking the stamp in between. The second image will be fainter and so on depending how many times you can re-stamp. This is a good technique for building patterns or depth.Using part of the stamp
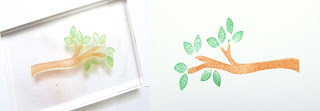
This is good if there's only a part of the image on the stamp that you want to use. There are two ways to do it. The first is just use the corner of your ink pad to pick out the parts of the image you want to stamp - you might go over where you want the ink to go (I know I do) but you can use a tissue or baby wipe to clean up any errant ink. This is good if you want to use two different colours too, like in the picture below.The second way sounds drastic - you cut the stamp up. This means you will only get ink where you want it and the two parts of the stamp can go back together by being 'clung' next to each other on the acrylic block.
Glitter stamping
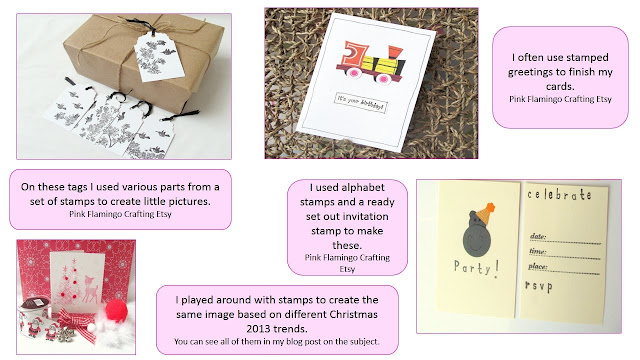
One of my favourites! You will need a sponge and some liquid glue for this. After you've clung you stamp onto the block, put some glue on the sponge and use this like you would your ink pad. Stamp the image and then sprinkle with glitter. If you're using a fine stamp make sure to use fine glitter. Tap the paper to remove the unstuck glitter and you have a lovely sparkly image.How I've used stamping in my work
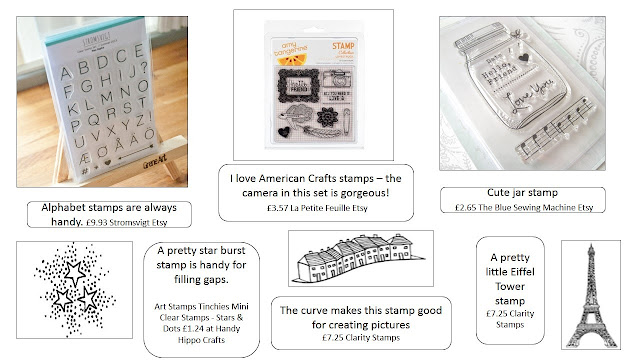
Lovely stamps to buy
I hope this gives you some ideas to try and to enjoy. Happy stamping!
(And don't forget, I love to see other people's work so feel free to share any stamping pictures.)


This is great--I've never even heard of clear stamps before (duh)!
ReplyDeleteThanks! They have other names too - some call them acrylic stamps or unmounted stamps which, confusingly, can also be another type of stamp! I hope this inspires you to find and try them!
DeleteI have loads of clear stamps - but don't use them unfortunately! But I might get them out now!
ReplyDeleteIt's nice to hear you might use them again! I go in phases myself of using them and then packing them away!
DeleteThanks Julia! I love glitter stamping, especially at Christmas.
ReplyDeleteThank you Carolyn! It's lovely to be a part of all the wonderful crafts!
ReplyDelete