Showing posts with label flowers. Show all posts

Monday, 5 May 2014

Fun With Felting

Felting is something that always looks fun and there are some amazing creations out there, but it's never something I've tried before. Until today! Sue from Apple Harvest very kindly invited me to play with her wools and show me how to make a flower. This is what we got up to...

Lots of gorgeous colours to play with!


Some of the 'tools' needed - hot soapy water, bubble wrap and a rolling pin


You have to keep rolling and turning the wool until it 'knits' together. It was also useful to use the end of the rolling pin to bash the flower too! One it's holding itself together, we rinsed the flowers in cold water then pinched them together and put them on a radiator to dry.


This red flower was my first attempt and didn't turn out quite as flower like as I was hoping! I was happier with this purple and pink creation though...


But Sue's creations are what you really need to see to show you how it's done...


Wednesday, 2 April 2014

How to Make Tissue Paper Flowers

I found a lovely book in a second hand shop the other day. It was a girls' annual from 1985 and had lots of great pictures and articles in it; it was also falling to pieces with a broken spine and had lots of scribbles on some of the pages - perfect for upcycling!

I started to cut it up to take images for card making and to add pieces to ephemera craft packs when I found a lovely page showing you how to make tissue paper flowers. So I thought I'd give it a go and turn it into a tutorial for here!

How to make a tissue paper flower

This is the original tutorial from the book...

Taken from 'Jinty Annual 1985'


It's a very simple process. All you will need are:
  • tissue paper
  • a paper clip or pipecleaner
  • scissors

Step 1

Cut the tissue paper to the size you want. On the page (and in this tutorial) 6 sheets of tissue paper are used which are 6 x 9 inches each. This has made a final flower that has a diameter of 5 inches.

 Step 2

Place the tissue paper flat in front of you then start to concertina the paper from one of the shorter ends folding it back and forth (like folding a paper fan).

paper flower tutorial

Step 3

In the original tutorial you use a pipe cleaner for this step to form a stem but I've used a paper clip as I wanted a flat back. Whichever you're using, place it in the middle of the folded paper to secure it.

how to make a paper flower

 Step 4

Now cut the ends of each side of the folded paper to create the shape of the petals.

how to make paper flower decorations


how to make paper flower decorations


  I wanted to make a rose style flower (like the big red one in the picture) so I cut the ends to be rounded.


Step 5

Now spread out the petals to form a circle turning the edges of the paper up to help it keep its shape.


Step 6

Next carefully pull up each layer of tissue to create the layers of petals.


And then you'll have your finished flower!

Handmade paper flower

   
I'll be using these to decorate all kinds of things. I think they'll look great instead of a bow on wrapped gifts or as table decorations. I'm going to make some smaller yellow ones for Easter decorations too!


Wednesday, 23 October 2013

'Book'cycling - things to make with old books

If you're a regular reader of my blog you'll now that I love upcycling. The idea of taking something that would otherwise be ignored or thrown away and turning it into something useful is too good to resist. I collect up many things to re-use but my favourite items are books.

upcycling books

I've got such a huge collection of them I'm running out of space to keep them so I thought I'd better get making. The only trouble is, I'm having a bit of a 'crafter's block' at the moment so I've been looking around for some ideas of new things to try and thought I'd share some here.

I do love books and have many that I'd never cut up, no matter how tatty they got! Just because a book's old or damaged doesn't always mean it's good for upcycling, you have to use your own judgement. These are the little rules I like to craft by; I'll re-purpose a book if:

  • it's clearly falling to pieces or has bits missing
  • it's been drawn in/written in over the writing or pictures (particularly found in children's books!)
  • there are lots of them 'doing the rounds' of second hand shops
  • it's out of date and no use anymore
  • it's damaged, eg, something's been spilled on it

So, to get my imagination working again I've gathered these ideas of past makes and future inspirations together. Enjoy looking through them and I hope you get some ideas too!

Some of My Tutorials

Paper Rose

This one's very easy but so effective. You only need a small piece of paper so it's great for using bits of good paper from damaged pages.

upcycled paper rose 


Gift Bow

Great for using strips of good paper rescued from damaged pages.

Upcycled paper bow tutorial 


Paper Beads

Lots of fun can be had making these with any kind of paper. Even if it's damaged or drawn on as the paper is rolled up this can be hidden.

paper bead earrings 


Inspiration to get over my 'crafter's block'

All of these projects are ones I've found while looking around on the internet. They are ones I'd love to try and will be a great excuse for getting through all my books! The links will take you to the full tutorial if you'd like to try them too.

A Book Pumpkin from Upcycled Treasures


This is a great step by step photo and written instruction tutorial and ideal for this time of year! I'll be trying it with any books that are old and no-body wants anymore.

diy-paper-book-pumpkin-upcycled-treasures
Upcycled book pumpkin tutorial on Upcycled Treasures


Paper Flowers from Hipcycle

Another paper flower! There are so many paper flowers to make and these are ones I particularly love.

Upcycled paper flowers
Paper flowers from Hipcycle


Paper Feathers from Todolwen

These look so pretty! These are made with sheet music (and look gorgeous) but could also be made with book pages. Great photo and written instruction tutorial.
Paper Feather Tutorial from Todolwen

My crafter's block seems to be lifting now! Off the do some upcycling...

Wednesday, 7 August 2013

A Unique Local Shopping Experience

Tapton Hall Farmers and Craft Market

Tuesday was a different day for me - a fair on a weekday.  Usually I'm a weekend stall holder in and around Sheffield which makes a lot of sense as people are off work more and in the shopping mood.  However, I thought I'd give it a go and I discovered some lovely local producers, crafters and customers.

After setting up my stall I had a wander around to see what was on offer and have a chat with the other stall holders. And as usual spend money before I made any!

First I discovered Make or Bake selling an array of baking goods. A whole rainbow (and more) of glitters and bun cases drew me in and then I noticed the champagne and the peanut butter flavourings - two of my favourites! I could have bought quite a lot here - put a showed restraint with just a couple of treats (and an early Christmas present purchase).

Make Or Bake

Next I had a chat with Janet of Home Grown Designs who makes beautiful cushions, bags, door stops and other textile products. She reworks discarded fabrics from clothes and sample books to create her work - an idea that I love and have in my own work too with paper.  I bought a pin cushion filled with fine sand which helps to sharpen the pins and needles (I always seem to blunt mine somehow!) as you use it and is also very helpful to use as a weight when crafting.

Home Grown Designs


Hollow Meadows Flowers was a stall I'd seen before at a similar market in Hillsborough where I'd admired the wild flowers and country garden look. I had a chat with Rachel whose stall it was and she told me about the more natural and unstructured look of her flowers which she grows herself. I even treated my mum to a bunch!
Hollow Meadows Flowers


My attention was then caught by Sweet Thing - it was a stall full of cupcakes after all! There was a whole selection of delicious looking cakes; the chocolate ones looked particularly appetising (and tasted just as good as they looked).

Sweet Thing

Their neighbour offered Nibble Nose cheeses, bread and cakes. I very much enjoyed sampling the handmade cheeses and couldn't resist a tasty caramelised onion cheddar which somehow made its way home with me...
Nibble Nose cheese

And finally I had a chat with Roy at The Olive Tree Soap Co.  He makes a tempting range of soaps using olive oil and all natural ingredients using the cold pressed method which takes 8 weeks to make it rich and lathering. This means that no additives are needed in it so it's much kinder to skin. There was a lovely range of gorgeous scents and I had trouble choosing but finally bought some olive oil soap for myself.  One other intriguing scent was choco and beer which I got as a little gift for a friend.

The Olive Tree Soap Co


Well, I thought it was finally until I learned about the stuffed vines leaves offered by The King Olive, a tempting stall with a variety of olives, stuffed peppers, homemade baklava and Turkish delight as well as the delicious stuffed vine leaves which ended up as my lunch (and were eaten before I got chance to take a photo!).

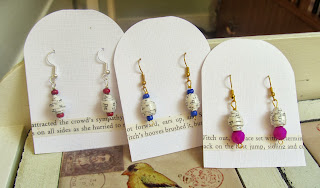
There was also my stall there with my usual range of upcycled and handcrafted cards, gift wrap and jewellery.

Pink Flamingo Handcrafting Tapton Farmers Market

So, an unusual prospect turned into a very enjoyable day finding lots of Sheffield's unique gems on a weekday.

Another market takes place on September 3rd and on the first Tuesday of every month at Tapton Hall, Shore Lane, Sheffield. Although it's only a small, local market, there are lots of wonderful things to discover.

All the stall holders do regular fairs in and around Sheffield too so there are plenty of places to discover them for yourself if you can't make it on a Tuesday.

Sunday, 4 August 2013

How to Make a Paper Daisy

I love making paper flowers.  I can spend hours playing with different papers trying to create a whole garden's worth! I think they're great to add to cards, tags and gift wrap to make a pretty statement and add dimension. When I was little I had a kit where you could make flowers out of tissue paper, I think that's where it must have started.

handmade paper flowers
A selection of my handmade paper flowers.

One of my favourite flowers to make is a daisy. They're such simple little flowers and have that association of making daisy chains in childhood reminding me of summer days. They are also very effective in a crafting project and look impressive - and they're really easy to make which makes them even more appealing!

Here's how to make one of your own...

You will need:

How to make a paper daisy


A strip of white paper 150mm long and 10mm wide, a strip of yellow paper 70mm long and 5mm wide, scissors, a quilling tool or cocktail stick, glue.


1. Take the strip of white paper and using the tip of your scissors make small cuts along the length of one long edge. Make sure you only cut half way across so that the other long side remains as it started. The cuts need to be only 2 or 3mm apart.

How to make a paper daisy


2. Get the strip of yellow paper and place it on the white strip at one of the short sides overlapping it a little. Make sure the 5mm width of the yellow paper is lined up with the uncut part of the white paper and the two bottom edges are lined up. Glue the yellow paper to the white paper where it overlaps.


How to make a paper daisy

3. Place your quilling tool or cocktail stick at the end of the yellow paper which isn't glued down. Start to roll the paper up around the tool or stick.

quilled paper daisy


4. Continue rolling the paper.  Keep going when you get to where it joins the white paper.

quilled paper daisy


5. When all the paper is rolled up, glue the end of the white strip of paper to the rest of the flower.

paper daisy tutorial


6. Carefully remove the quilling tool or cocktail stick.  Use your fingers to spread out the 'petals' of the daisy.  You're done!

paper daisy

You could also try:

  • using different colours of paper;
  • inking the edge of the petals when you've finished (I love when real daisies have a pinkish tinge to the edge of their petals and it looks really good on paper daisies too);
  • making an upcycled one - they look great made using old book pages; 
  • varying the length and width of paper - just be aware that the bigger the paper, the 'bulkier' the flower which could get a little difficult to handle when rolling;
  • adding glitter glue to the edge of the petals of the finished flower for a sparkly effect - this looks especially nice if the colour of the glue is the same as the colour of the paper.

Saturday, 27 July 2013

How to Make an Upcycled Paper Rose

Paper flowers make lovely additions to lots of crafting projects.  They make great embellishments for cards, gift tags and gift boxes as well as being decoration for anything from notebooks to table settings. One of my favourites (and easiest!) to make is a paper rose, and here I'll show you how to make one too. This tutorial is suitable for adults and children - but make sure you have adult supervision to use scissors.

I like to make them by upcycling paper from old, falling to pieces, unloved books, music sheets and maps, but feel free to use whatever paper you like.  Remember, if you are upcycling the idea is to make something that wasn't useful any more have a new purpose - so don't just rip up anything! Think if it's past its best or if it will be of use to anyone first.


a book to upcycle
This is the book I used which is clearly falling to pieces and has missing pages.  It went from this ...

upcycled paper rose
...to this!


Instructions for making an upcycled paper rose

You will need: a square of paper about 6cm x 6cm (2 1/2 inch x 2 1/2 inch); glue (I like to use PVA); scissors; a quilling tool or cocktail stick.

tools for making a paper rose

1. Take the square of paper and use your scissors to round each corner. (Ask an adult to help if you're one of my younger readers - always be careful using scissors.)
how to make a paper rose

2. Now cut into the paper about 1 cm (1/2 inch) down from the top right hand corner.
paper rose instructions
3. Continue cutting along the paper stopping about 1 cm (1/2 inch) from the left hand side.  Turn the paper clockwise and continue cutting.  Keep cutting in this spiral fashion until you have a finished paper spiral.
paper rose instructions
4. Using your quilling tool or cocktail stick, take the start of the spiral where you first cut and start to roll the paper following the spiral towards the middle.
how to make a paper rose
5. When you reach the middle of the spiral gently take the rolled up paper off your quilling tool or cocktail stick while holding the paper gently in place.  Slowly let go of the roll of paper a little until it unfurls to look like a rose.
make a paper rose
6. Now put some glue onto the circle of paper that was in the middle of the spiral and is now at the bottom of the rose.  Stick this circle to the base of the rose and hold for a few seconds to fix it in place.

upcycled paper rose tutorial


 And there it is, your finished rose!

upcycled paper rose
Once you know how to make them you can have fun trying different effects. Try...
  • cut the original square of paper with a wavy edge instead of straight;
  • colouring the edge of the square of paper with inks or crayons;
  • using different papers - books, maps, pictures, magazines;
  • cutting the paper to different sizes. 
This project and lots of other crafty ideas can be found at:
http://totallytutorials.blogspot.co.uk/