Showing posts with label books. Show all posts

Saturday, 12 April 2014

Upcycling...how I choose my materials

Before I even knew what it was called I was upcycling. I've never been able to throw away things which could be useful or were just too pretty to get rid of. Even as a child I'd save bits of paper, stamps, sweet wrappers (and anything else that caught my eye) and turn them into pictures, cards and decorations.

I've never been a hoarder, everything is clean and tidy and has it's place. As my collection has grown I realised I needed to put it to more uses than just fulfilling my own needs, and that's when I started Pink Flamingo Handcrafting. I first started making and selling items using what I already had, but as my little business has grown so has the need for materials.

Ephemera - everyday objects that would usually be thrown away

So now I have to actively look for items to upcycle as well as collecting bits and pieces that would have been thrown away. I often get asked where I find things and how I use them, so I thought I'd share my ideas on this subject here.

A selection of broken books from a recent trip to an antiques centre

As a book lover and English Literature graduate, I can't bear to cut up books which are still readable, entertaining or informative. I'll often see books that I'll look through and think the pictures would make gorgeous cards, but the book itself (for example a cook book) is still perfectly useable. In that case I always put it back and hope it finds a good home.

Other books though aren't as lucky. Over the years they've been well loved, read, played with and ...well, look rather worse for wear. These are the books that I like to 'rescue'. If their spine is broken and the pages are falling out then I won't feel so guilty about tearing it up; if a child has lovingly scribbled all over the pages trying to draw their own versions of the pictures I know another child won't want to read it; if the book's been left lying somewhere forgotten and half the pages have discoloured and curled then I know I can rescue the good bits.

A puzzle book's not much use when all the crosswords are complete!

Of course, I only use the parts of the texts which are undamaged to make sure that my customers get great quality cards and gifts.

So, that's how I choose the materials I use in my work. And if you ever want to know exactly where the papers on your purchase have come from, all you have to do is ask me (I have a terrible memory for some things, but books always stay in my head!).

Sunday, 16 March 2014

Sheffield Up Market

A new vintage and craft fair has been taking place at the University of Sheffield over the last few months and is quickly becoming established as a fun place to shop. The Sheffield Up Market is a range of traders selling various vintage and new items including clothes, bags, shoes, jewellery, books, tea, art... and Pink Flamingo's items!

Pink Flamingo's stall at the March Sheffield Up Market

The most recent market took place last Thursday right in the heart of the Students Union building and was its usual eclectic mix. Here are just some of the things you might have found there...


If you followed the signs you would have found...

Lots of clothes to choose from!
Vintage Clothes and accessories


Leather bags


Shoes!


Pink Flamingo's Sheffield pictures

The next Sheffield Up Market takes place on 13th May in the Foundry/Fusion/Studio at the University of Sheffield.


Tuesday, 11 March 2014

Turning Old Book Covers into New Treasures

I can't resist an old book. When I go into a second hand shop the first place I head for is the book shelves. As well as looking for some interesting reading material, I also search out damaged, worn, drawn in and forgotten books to reuse in my crafting. I like the idea of taking a book that no-one wants anymore and transforming it into a beautiful new object. Usually I just use the pages inside the book, and that left me with a pile of old book covers which I can't bear to throw away.

A lot of what draws me to books for crafting are the beautiful illustrations, and these can be seen on the covers too. The wonderful outer casings of hard backed books often have beautiful drawings and vibrant colours which would look just as attractive being used as something else too. So instead of throwing them away I had a look around for inspirations and came up with a new use for them...

Book Cover Note Pads

For these notepads I've removed all the pages from an old book and added some stationery to the inside. I'll be taking these with me to the spring craft fairs I've booked.


Old book cover notepad - Pink Flamingo Handcrafting
Making stationery using old book covers - Pink Flamingo Handcrafting
Uses for old book covers - Pink Flamingo Handcrafting


Upcycling old book covers - Pink Flamingo Handcrafting


Other ideas for using old book covers

Whilst doing some research for ideas on using old book covers (or 'looking through Pinterest') I found some other wonderful ways to get creative. Here are some of my favourites - click on the pictures or titles to find the original tutorials.

Book handbags

Combining books and bags just has to be a winner!

book bag
Find the tutorial for this take on a book bag at Country Living


Book spine bookmarks

If the whole of the cover isn't in the best condition, just rescue the spine to make a bookmark.

http://www.morningcreativity.com/diy-bookmarks/
Take a look at Morning Creativity for the instructions

A disguise for your wireless router

I love the idea of mixing new technology with old books! Here you can use attractive covers to hide not so attractive equipment.

http://www.apartmenttherapy.com/how-to-make-a-book-cover-disguise-for-your-wireless-router-171857
Apartment Therapy shows you how

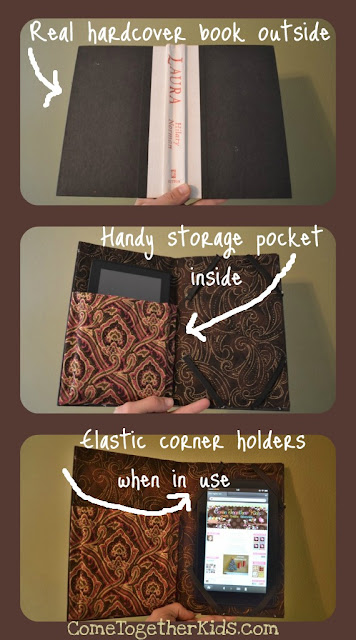
An old school cover for a new kind of book

Following on from the last idea, there's something fun about having the new way of reading inside the old one!

http://www.cometogetherkids.com/2011/12/kindle-cover-from-hardcover-book.html
A very detailed tutorial by Come Together Kids


Friday, 14 February 2014

Let Me Introduce You To...

There are two things I find it difficult to resist buying (okay, there's more than two, but these are the top two): old paper and jewellery. So when I find them combined I just can't help taking a closer look.

This post is in no way sponsored or influenced. All opinions are my own and any quotes are taken directly from the people I'm writing about.

This week I'd like to introduce you to...


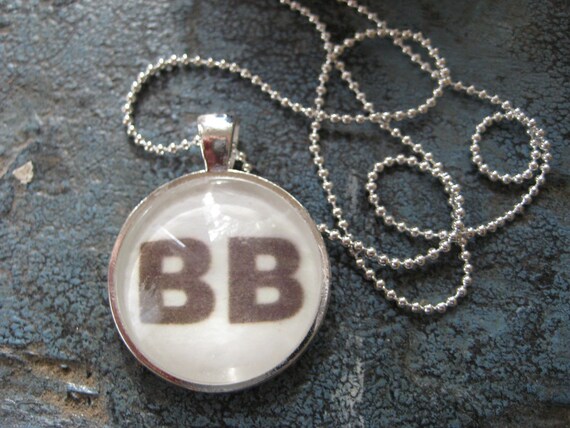
Left Brain Right Brain (as the name suggests) is an interesting mix of styles, concepts and ideas. It's based on the notion that 'people are predominantly, left brained or right brained, organized thinkers, or free spirits' but combines the two to mix science (left) and art (right) to create wonderful pieces of jewellery.

This interesting and unique jewellery is the work of Heidi who herself has combined both her scientific and artistic sides to create 'scientific artwork that (she) would be proud to wear'. She has a background in science and education, with a PhD in neuroscience, and has taken this love of the details and textbooks and combined it with jewellery making to create pieces 'for the science geek or guru'.

Let me introduce you to... science jewellery from Left Brain Right Brain

Anyone who's seen my own work will know that I love to salvage and rescue old books saving the vintage images to reuse in interesting ways, and that's something that's definitely appealing about Left Brain Right Brain's jewellery. The thought of a text that has had it's place in social history still being used today, for me, keeps the past alive and is a glimpse into past ideas and thinking; sometimes it's amazing to see what has (and hasn't) changed!

Heidi likes to think of her creations as 'conversation starters' and they'll certainly be useful if you want to chat to someone 'whose life revolves around pi'. They're a statement of intellect as well as a fashion item and show that geek chic is something that can be done in a stylish way. Luckily as she lives in a little town which 'is flourishing with vintage and antique shops', Heidi will be able to keep creating these unique pieces.

Striking up a conversation about your jewellery can also make you sound very educated as many pieces have a mini science lesson attached to them (which are much more interesting than the ones I remember from school) to entertain your friends with. The story behind this pendant in particular is an interesting read!


Dominant BB brown eye Genotype Silver Pendant
Pendant £8.67 Left Brain Right Brain

So whether you're dominated by your scientific left brain or your creative right brain, you'll find something to satisfy it in Heidi's jewellery!

Find out more:

Shop for jewellery


Wednesday, 29 January 2014

Shop Sheffield

Regular readers will know that one place I sell my work is Bird's Yard in Sheffield city centre. For those of you who don't know, it's a collection of local independent designers all under one roof selling a variety of handmade, vintage and locally made items. There's a huge array of lovely things to buy including greeting cards, ceramics, baby clothes, preserves, books, accessories, clothes... basically lots of choice!

As well as being made in Sheffield, a lot of the designers like to make items with a Sheffield theme. There's a pride in the city for those who were born or have come to live here and people like to buy souvenirs, reminders or keepsakes.

Bird's Yard Sheffield Valentine's window
Here's my Heart Sheffield card in the shop window

So I thought I'd share with you some of those wonderful Sheffield items. If you live around here call into the shop and pick up a treat; if you don't live near a lot of the designers have their own websites too and contact details can be found at Bird's Yard website and are always happy to hear from people!

Sheffield books and cards at Bird's Yard


Sheffield jewellery at Bird's Yard


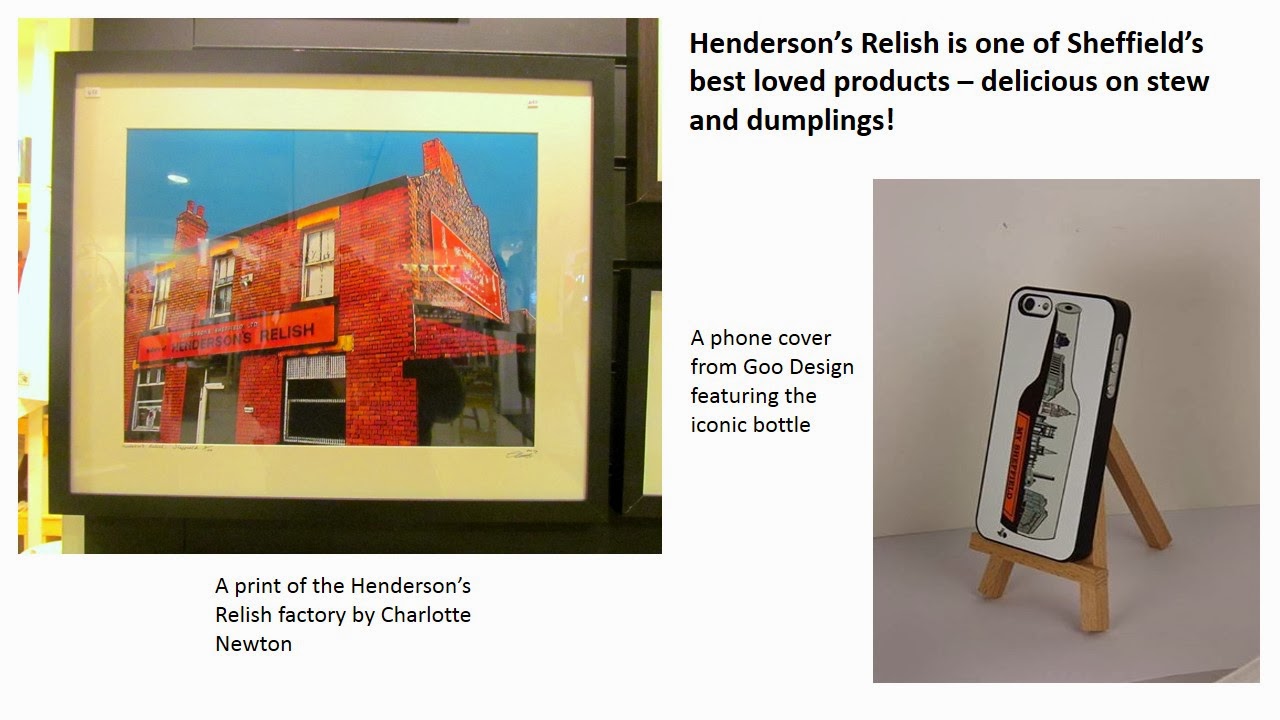
Henderson's relish products at Bird's Yard

Friday, 24 January 2014

Let Me Introduce You To...

Last year on this blog I had a weekly feature showing the work of one of my favourite UK crafters. I love to look through other people's work and creations and share the passion that goes into the pieces. While doing my research (it was research, not just window shopping!) I found lots of wonderful people who were either outside the UK or were vintage sellers rediscovering rather than creating treasures.

So, for a new year I'm having a new way of working this weekly feature. I'm broadening my searching and bringing you lots of new non-UK and/or vintage sellers to be introduce you to, and hopefully love their work as much as I do.

This post is in no way sponsored or influenced. All opinions are my own and quote are taken directly from the people I'm writing about.

This week I'd like to introduce you to....


 caring for vintage clothes, clothing, storing vintage clothes, washing instructions, advice, uk, catwalk creative
Catwalk Creative Vintage
Catwalk Creative is a home for wonderful vintage pieces including quality, hand picked clothing, accessories and homewares dating from the 1920s - 1990s. There's a great range of pieces all kinds of tastes and budgets and it's wonderful looking through all the unique and retro pieces to find new favourites.


My favourite way to spend an afternoon is wondering around an antique centre or vintage shops looking at all the unusual and fun items for sale. However, I'm no expert when it comes to what pieces are or their history, so I love finding someone who does know and wants to share that knowledge. That's what I love most about Catwalk Creative Vintage's site, as well as buying items you can find out their story too as well as lots of additional information and suggestions - just like having a personal shopper!

Let Me Introduce You To... Catwalk Creative

Catwalk Creative Vintage is the idea and work of Louise who has been buying and selling vintage items for nearly 10 years. She established her own online emporium in 2008 selling a whole range of stylish items for you and your home. As well as running her own business, Louise is also a member of the Vintage Fashion Guild who are a great resource of information on and promotion of vintage items. She says of them 'we are committed to providing excellent customer service and accurate information' which, if like me you know little about vintage, is a reassurance that what you buy is genuine and good quality. 

Louise sources the items she sells from a range of countries and contacts so she can offer a varied and unique collection where you can 'be sure to find something special to add to your own collection'. The wealth of knowledge she has gained from her trading means Louise is also able to offer lots of useful advice about subjects such as caring for clothing and accessories, vintage clothing sizes and suggestions of outfits and collections from different decades. 

A piece of advice from Louise- In order to keep your precious clothes in good condition, wash them less...
a good airing can often work just as well for removing odour without damaging the garment.

 
(Any excuse to do less laundry is fine by me! I'll have to buy more vintage clothes as an excuse.)

For Louise vintage means items 'over 20 years' which have had a previous life and use. There are other shops I've seen who use this cut off point to sell anything and claim it as 'vintage' when it's just 'stuff' that was made a couple of decades ago. Catwalk Creative hand picks quality items to truly represent their era and give you a proper vintage piece. This commitment to offering the customer quality pieces means that Louise has established a 'sterling reputation in the vintage clothing industry' (and with over 150 five star reviews in her shop on Etsy.com it's clear others think so too!).

These are some of my favourite items from my favourite era from Catwalk Creative:

1950s fashions from Catwalk Creative

Find out more about Catwalk Creative here:


Monday, 13 January 2014

Unique and Upcycled Paper Bunting Tutorial

If you've read any of this blog before or seen my work you'll have seen that I love to use old paper in crafting. I love to find different ways to create new pieces which are unique and can be made to be personal for the person they're made for.

In this tutorial I'm going to show you how you can make some simple paper bunting using old papers which is something I made last summer. I had a stall at a fair outside and had a gazebo so I thought I'd decorate it in a festive way to match the items I was selling. As well as prettying up a gazebo, this bunting is great for parties and other celebrations and can be made to suit the person by choosing the type of texts they like.

How to make paper bunting


You will need:

  • various old papers - maps, book pages, magazines, music sheets
  • string
  • glue (I use PVA)
  • pencil
  • ruler
  • scissors
upcycled paper bunting tutorial

Step 1

Sizes and quantities will depend on how long you want the length of bunting to be and how big you want each flag. As such I'm not giving exact measurements, just cut the paper and string to the size you want.

Cut a piece of paper into a triangle that's longer than it is wide.

paper craft idea

Step 2

Turn the triangle over so the reverse side is facing you. Draw a line across the paper 1.5cm down from the top. Fold the paper down along where the line is.

Upcycled paper craft tutorial


Step 3

Turn the triangle of paper around so the 'right' side is facing you. Where the flap of paper at the top has been folded down there will be a little piece overhanging at either side. Cut these off.

making paper bunting

Repeat steps 1 - 3 to make as many paper flags as you need. Cut a length of string long enough for all the flags to fit on remembering to leave enough string at either end to be able to tie the bunting to wherever you're hanging it (I usually leave about 1 metre at each end).

Step 4

Turn the paper over again so the reverse side is facing you. Spread glue along the flap at the top of the triangle.

upcycled paper craft

Step 5

Place the length of string along the folded line then fold the glued flap over and press it down.

make your own paper bunting


Repeat until all the flags are glued onto the string, and you're finished!


It's as easy as that! Now you know how to make a cheap and unique decoration for all kinds of occasions. They can be stored easily to reuse or the paper is recyclable when you've finished with them.

Find this tutorial and lots of other makes at http://bebetsy.com/author/simply-author/Pink+Flamingo+Handcrafting/

Wednesday, 23 October 2013

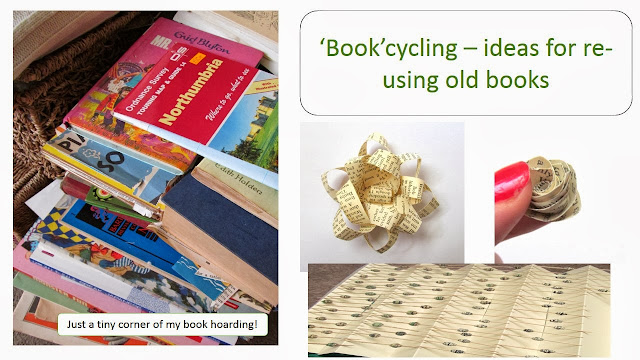
'Book'cycling - things to make with old books

If you're a regular reader of my blog you'll now that I love upcycling. The idea of taking something that would otherwise be ignored or thrown away and turning it into something useful is too good to resist. I collect up many things to re-use but my favourite items are books.

upcycling books

I've got such a huge collection of them I'm running out of space to keep them so I thought I'd better get making. The only trouble is, I'm having a bit of a 'crafter's block' at the moment so I've been looking around for some ideas of new things to try and thought I'd share some here.

I do love books and have many that I'd never cut up, no matter how tatty they got! Just because a book's old or damaged doesn't always mean it's good for upcycling, you have to use your own judgement. These are the little rules I like to craft by; I'll re-purpose a book if:

  • it's clearly falling to pieces or has bits missing
  • it's been drawn in/written in over the writing or pictures (particularly found in children's books!)
  • there are lots of them 'doing the rounds' of second hand shops
  • it's out of date and no use anymore
  • it's damaged, eg, something's been spilled on it

So, to get my imagination working again I've gathered these ideas of past makes and future inspirations together. Enjoy looking through them and I hope you get some ideas too!

Some of My Tutorials

Paper Rose

This one's very easy but so effective. You only need a small piece of paper so it's great for using bits of good paper from damaged pages.

upcycled paper rose 


Gift Bow

Great for using strips of good paper rescued from damaged pages.

Upcycled paper bow tutorial 


Paper Beads

Lots of fun can be had making these with any kind of paper. Even if it's damaged or drawn on as the paper is rolled up this can be hidden.

paper bead earrings 


Inspiration to get over my 'crafter's block'

All of these projects are ones I've found while looking around on the internet. They are ones I'd love to try and will be a great excuse for getting through all my books! The links will take you to the full tutorial if you'd like to try them too.

A Book Pumpkin from Upcycled Treasures


This is a great step by step photo and written instruction tutorial and ideal for this time of year! I'll be trying it with any books that are old and no-body wants anymore.

diy-paper-book-pumpkin-upcycled-treasures
Upcycled book pumpkin tutorial on Upcycled Treasures


Paper Flowers from Hipcycle

Another paper flower! There are so many paper flowers to make and these are ones I particularly love.

Upcycled paper flowers
Paper flowers from Hipcycle


Paper Feathers from Todolwen

These look so pretty! These are made with sheet music (and look gorgeous) but could also be made with book pages. Great photo and written instruction tutorial.
Paper Feather Tutorial from Todolwen

My crafter's block seems to be lifting now! Off the do some upcycling...

Sunday, 18 August 2013

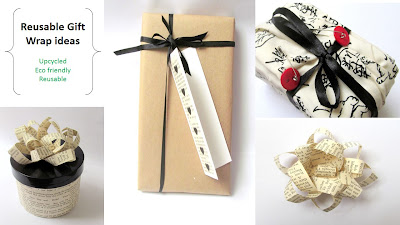
Resuable Gift Wrap ideas - where the wrapping is a present in itself

Everyone loves to receive a present (you should see me on Christmas morning!) and when it's beautifully wrapped it makes it all the more special.  One thing though that seems a real shame is the pile of used gift wrap that is lying around after with the only option to throw it away. Now don't get me wrong, I love to scavenge through the wrapping remains and save bows, ribbons and anything else that can be reused (there's a running joke in my family about some gift boxes that everyone's received a present in!), but what about if the whole of the wrapping could be used again? This thought is what led me to these ideas...

Reusable gift wrap Pink Flamingo Handcrafting

Fabric Gift Wrap 

I've seen this idea in one or two places and loved it. The idea is that the wrapping is reusable as, unlike paper, it isn't stuck down and doesn't tear. I also thought it you be particularly apt for a crafty friend who you are giving a sewing themed present to, especially with a couple of added reusable decorations. 

For this gift I cut a piece of fabric to the right size for the box, put the box into the centre of the material and folded the two longer edges into the middle of the top of the box.  Then I folded the remaining fabric of the two shorter sides so that the raw edges were hidden and folded this over the top of the box securing it in place with safety pins. Next I tied ribbon around the box then removed the safety pins one at a time to add a red button before pinning back on the present.

Fabric gift wrap

Covered Tub or Canister

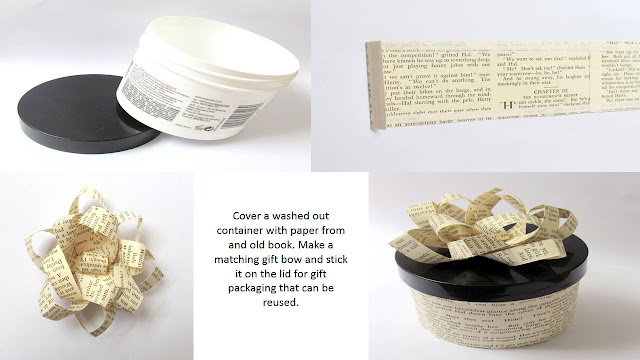
I can't help saving used jars, tubs, boxes...well, anything that could be a handy container again. Sometimes I use them as they are as storage such as these jars filled with buttons, or I cover them in pretty papers to keep things in like this chocolate box which is a home for my candles. They also make good containers to put gifts in as then the recipient can use them again too.

reused storage containers


Here I've used an empty, washed out conditioner tub. As it had a plain black lid it was easy to keep this and just cover its body. I just cut a strip of paper long enough to wrap around the tub with an extra inch added on for the overlap. I folded the end of one of the short edges over to make it neat, then stuck double sided sticky tape on the back and stuck it around the tub with some extra tape at the overlap.

upcycled gift wrap

The matching bow on top can be made using the instructions further down.

Bookmark Gift Tag

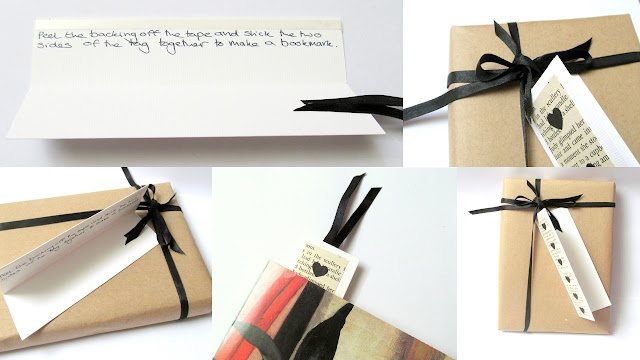
There's someone I know (who shall remain nameless) who when I've given them a gift with one of my handmade tags on it, saves the tag and puts a sticker over the writing on the back so they can reuse it. I do like this idea of reusing and it got me to thinking about what other uses gift tags could have so that they aren't thrown away. That's when I thought about a bookmark gift tag, especially if the present you're wrapping is a book for someone who, like me, thinks no present giving occasion is complete without one!

All I did was cut a piece of white card measuring 80mm x 120mm and scored it in half down the length of the card. I added a strip of old book paper and some punched paper hearts as decoration on the front. Then inside I used double sided sticky tape to stick down two pieces of ribbon at the top so that most of it came out over the top of the card. I then added a strip of double sided sticky tape down the edge of the tag inside the front and added a message to explain how to turn the tag into a bookmark. Use the ribbon on the top to attach the tag to the present.

upcycled bookmark gift tag

How to Make a Paper Bow

To add a finishing touch to a gift, an upcycled paper bow looks great. I used a page from a book to make this one but you can use any kind of paper. The measurements below suited the gift I wanted to put the bow on but they can be adjusted to your needs.

You will need:

  • Scissors
  • 3 strips of paper 250mm long x 15mm wide
  • 3 strips of paper 220mm long x 15mm wide
  • 1 strip of paper 50mm long x 25mm wide
  • Double sided stick tape or glue
Step 1
Take one of the longest pieces of paper and fold it into a figure of 8 shape as below. Use sticky tape or glue to hold the ends in place. 
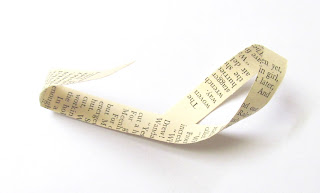
how to make a paper bow
Take one end and twist it around securing it under the middle of the strip.
how to make an upcycled paper bow
Do the same with the other end, again securing it underneath the middle of the strip.

Step 2
Repeat step 1 with the remaining 2 longest strips.

Step 3
Add double sided sticky tape or glue to the back of 2 of the 'figure of 8's that you've just made where the paper crosses over. Place them one at a time on top of each other spacing them evenly to make a circle.
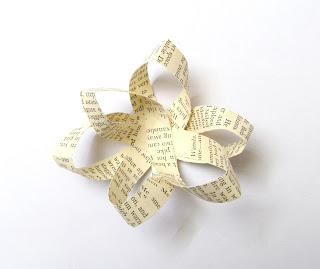
How to make an upcycled paper bow
The 3 longest pieces of paper stuck together to make the base of the bow.

Step 4
Repeat steps 1-3 with the next 3 longest strips of paper. You should end up with two layers to the bow as in this picture.
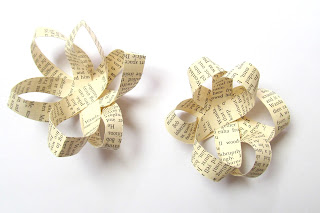
How to make an upcycled paper bow
The two layers of the paper bow.

Step 5
Roll the smallest piece of paper into a loop and secure with tape of glue.
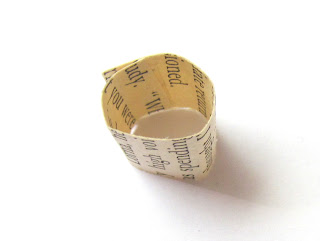
Paper bow tutorial
The paper loop which will be the centre of the bow.

Step 6
Use glue or tape to stick the middle layer inside the bottom layer and then the loop inside the middle layer to form the finished bow.

Upcycled paper bow tutorial
The layers are stuck together to complete the bow.