Showing posts with label Halloween. Show all posts

Sunday, 6 October 2013

Quick and Simple Halloween Cupcake Topper Tutorial

Halloween is fast approaching and parties are being planned. And with that in mind I've created these easy to make cupcake toppers just for the occasion! Make a mix of plump orange pumpkins, bandage wrapped mummies and flying bats to decorate your party table - or just to amuse yourself on some cupcakes you've made.

How to make Halloween cupcake toppers

Take care if you're making these with young children as there are small parts and pointy cocktail sticks. Always supervise children when they are eating cupcakes with these toppers in.

You Will Need

How much of each depends on how many toppers you want to make:
  • Thin card or thick paper in white, orange, black and brown
  • A circle punch or a coin to draw around (I use a 1 inch punch)
  • A black pen
  • A pencil
  • Scissors
  • Cocktail sticks
  • A wet glue such as PVA

Pumpkin Cupcake Topper

Halloween cupcake toppers tutorial

1. Use the circle punch (or draw around a coin) on the orange paper to make two circles.

2. Cut a little piece off the top and bottom of each circle so they look more pumpkin shaped.

3. Use the black pen to draw lines down each pumpkin. Make the lines at the side curved to make it look rounder. Cut two small stems out of the brown paper.

4. Spread glue on the back of one of the pumpkins. Spread it thinner around the edges (so it doesn't splurge out in the next step) and add more in the middle. Place a cocktail stick in the centre of the glue.

5. Now press the other pumpkin (lined side facing out) onto the glue to make a double sided topper. Spread glue onto one of the brown stems and stick it to the top of the pumpkin on one side. Making sure the stems will fit together, spread glue on one side of the other stem and fix it to the other side of the pumpkin.


Bat Cupcake Topper

How to make cupcake toppers

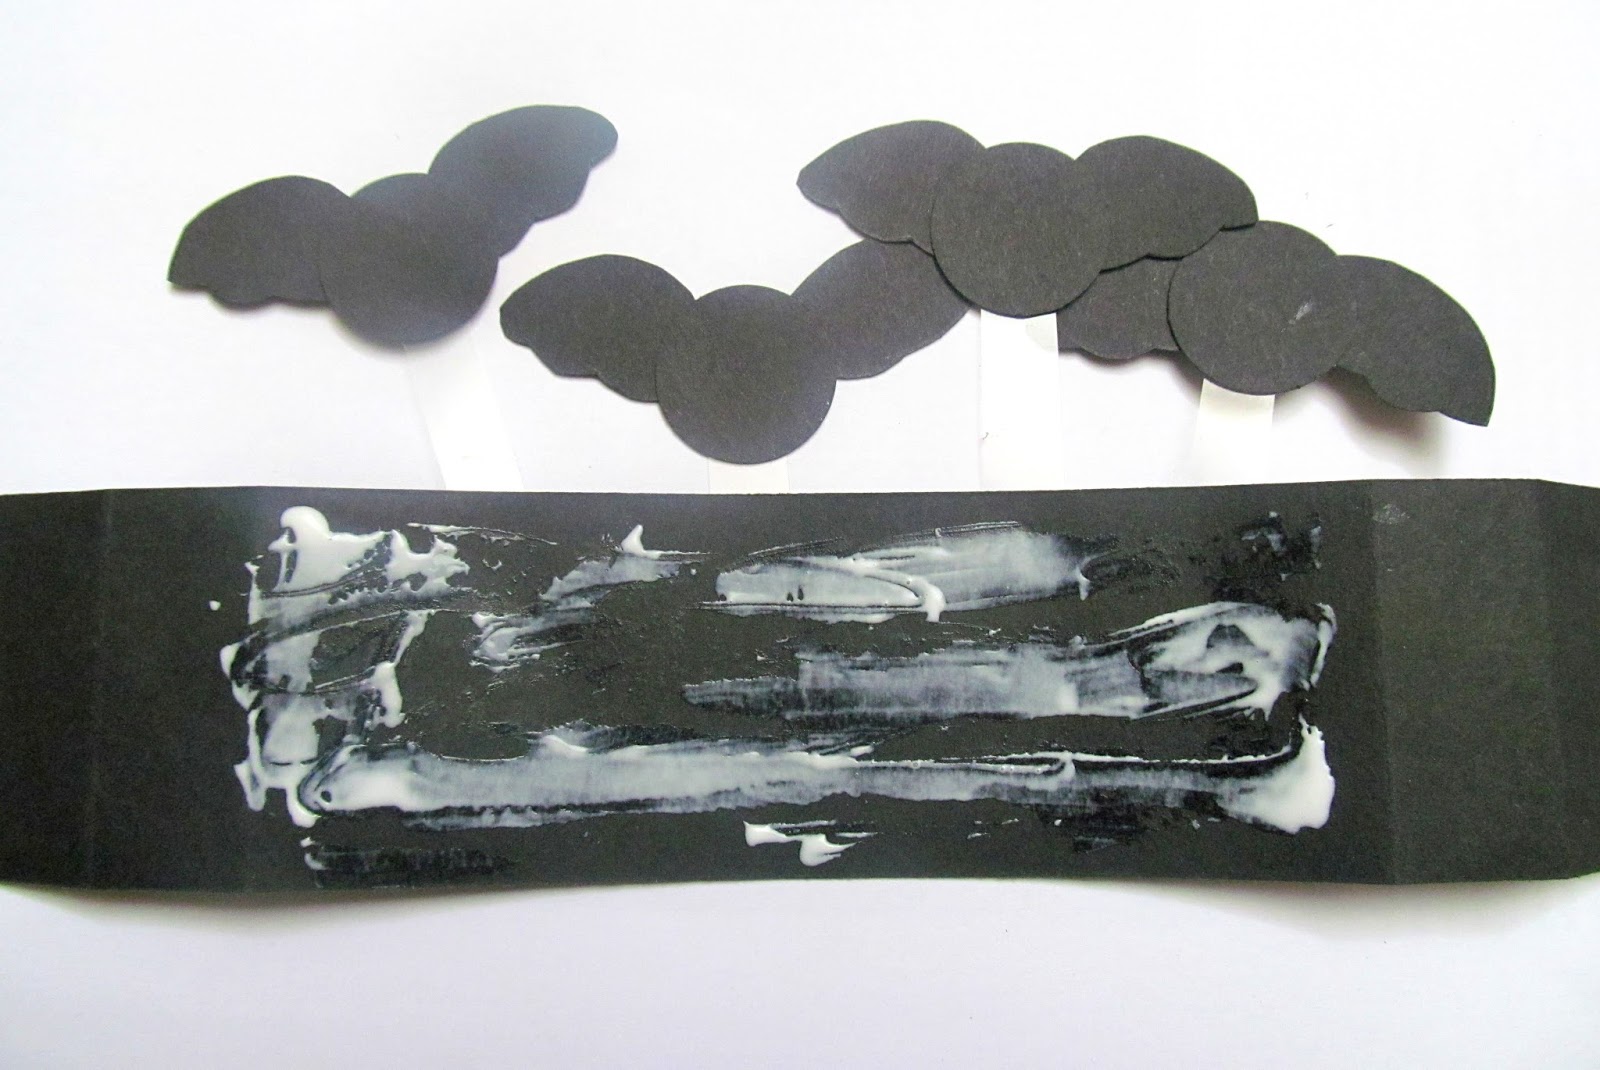
1. Use the hole punch (or draw round a coin) on the black paper to make 2 circles. Cut out two bat wing shapes following the shape in the pictures.

2. Put a little bit of glue on the tip of one wing and stick it onto the left edge of one of the black circles. Do the same with the other wing sticking it across the circle on the right hand side.

3. Spread glue over the back of the black circle. Put more in the middle to help secure the cocktail stick and less around the edges so it doesn't splurge out in the next step. Put the cocktail stick in the middle of the circle.

4. Press the other black circle over the glue to finish the bat cupcake topper.


Mummy Cupcake Topper

Halloween cupcake toppers
1. Use the hole punch (or draw round a coin) on the white paper to make two circles.

2. Use a black pen to draw two black circles for eyes on one of the white circles. Add some lines to make them look like bandages. On the other white circle (which will be the back of the head) just draw some lines for bandages.

3. Spread glue on the the reverse of the circle without the eyes. Put more glue in the middle to help secure the cocktail stick in place and less glue at the edges (so it doesn't splurge out in the next step). Place the cocktail stick in the middle of the circle.

4. Now press down the circle with the eyes onto the glued circle. Make sure it's the right way up!


Now all I have to do is get baking!

Friday, 4 October 2013

My Favourite UK Crafter of the Week - beautiful embroideries, cushions and other treats by Mirry Mirry

Just a warning first. It's impossible not to fall in love with this shop - once you take a peek you'll want to see everything in there! And all the profits are donated to the charity Invest in ME who fundraise for research into the cause and cure of ME. Another great reason to take a look around (and maybe start planning that Christmas list...)

As usual, this post is in no way sponsored or influenced. The crafter featured is genuinely a favourite of mine; all quotes are the crafter's own and the opinions are mine. So, with this in mind this week's UK Crafter of the Week is...

Mirry Mirry

Mirry Mirry is the crafty creation of Mirry as a place to sell her work. She's not always made embroidered and sewn items but started it as a hobby when she became ill in her early 30s and had to give up a career she loved in the travel industry. Mirry wanted a hobby as been at home meant you need to 'find new ways to help you pass the hours in the day' and first took up cross stitching but 'didn't like being told what to do' so turned her skills to free hand embroidery instead! This allows her to create works are art which are her own designs and ideas and make them one of a kind - like this fun Halloween picture which combines printed fabric and 'blood burgundy' embroidery.

Spooktacular Halloween Picture. Fun Embroidery Art. in Black and White. Spooktacular night. 5 x 5 Inch Hoop by mirrymirry
Halloween Embroidery Picture £14.53 by Mirry Mirry
As well as embroidery Mirry also enjoys sewing and spends 'hours and hours ... scouring for new fabrics' to create her projects with. This adorable cushion uses a printed fabric cut and stitched to maximum effect to create a cute character. Mirry finds a 'great joy in crafting' which clearly comes across with the bright colours such as these that she chooses for many of her pieces as well as the delicate details in others.


Japanese Doll Print Pillow. Fun Cushion.  Bright Pink Bold Multi Colours by mirrymirry
Japanese Doll Pillow £15.17 by Mirry Mirry
Mirry loves the fact that she's able to sell on Etsy as it gives her an opportunity to keep on crafting as she 'couldn't bare to see a cupboard full of crafts without a home'. Everything she makes would make a beautiful gift for someone and I think this is great as reading about Mirry and her work it's clear that she enjoys crafting and sharing her work so giving it as a gift carries on this idea. She loves 'all beautiful materials' and will 'only ever work with premium quality supplies' which means you can rely on buying something special for your loved ones. These little lavender pillows would make a lovely present for lots of occasions.


Embroidered Lavender Sachet Pillows - Set Of Three - Pure Cotton Pouches In Sky Blue - by mirrymirry
Set of 3 Embroidered Lavender Pillows £11.06 by Mirry Mirry

It's wonderful to look around Mirry Mirry and read the stories and inspirations behind pieces as well - something that makes buying handmade and direct from the creator even more special. This picture is based on a watercolour Mirry created and turned into an embroidery, the yellow background fabric 'represents the sunny day'. Being able to get these details makes the pieces come to life and shows the thought and care it takes to make something. And Mirry says herself she loves 'observing the works come to life' as she makes them.

Hand Embroidered Original Picture. Yellow. Pretty Round Art Decor ready for display. 5 x 5 Inch. Been Swimming by mirrymirry
Embroidered Picture - Been Swimming £24.64 by Mirry Mirry
So if you're looking for some little gifts and treats and like the ideas of supporting research into ME at the same time, take a look at Mirry Mirry.


To see more of Mirry's work take a look here:

Mirry Mirry's shop on Etsy


Sunday, 15 September 2013

Flying Bats Halloween Card Tutorial

The nights are getting longer; the leaves are turning brown - autumn is definitely on its way! And this means that Halloween isn't far away either. I love it as another reason to make spooky and fun crafts and here I show you how to make a 3D flying bats card; or it can be a stand up decoration for your own home.


Halloween card tutorial

This project was designed with children in mind. As scissors and small parts are used adult supervision is required at all times. It will make a fun craft activity to share with your children as the nights draw in!

You will need:

  • a piece of orange card 15x15cm
  • a piece of black card 5x24cm
  • a piece of black card approx. 6x18cm
  • a strips of acetate (or clear plastic from packaging - be careful of sharp edges). 2 measuring 1x6cm and 2 measuring 1x8cm
  • silver paper
  • cotton wool
  • a scrap of card approx. 2.5x3.5cm
  • scissors
  • glue (I find a wet glue like PVA best)
  • pencil
  • ruler
  • star punch
  • circle punch or a coin to draw around

How to make a Halloween card


Step 1 
On the scrap of card draw a wing shape like the one in the picture and cut it out to make a template.


Step 2
Draw around this template 8 times on the piece of black card that is 6x18cm. Cut out the wings.


Step 3
Use the circle punch (or draw around a coin) to make 4 black circles using the same piece of card you cut the wings from.

Bat Halloween card


Step 4
Spread a little glue onto the corner of a wing. Stick this corner behind one of the black circles. Spread glue onto the corner of another wing and stick this corner behind the black circle too but on the other side to make it look like a flying bat. Make 3 more bats in this way. You can vary the position of the wings to make it more interesting.


Halloween card tutorial


Step 5
Spread some glue onto the top 1cm of one of the acetate strips. Stick this to the back of one of the bats. Repeat with the other bats and acetate strips.

Bat card tutorial


Step 6
Take the piece of black card measuring 5x24cm and place it in front of you with the long side running along the top and bottom (landscape). Mark lines at 2.5cm, 4.5cm, 19.5cm and 21.5cm running vertically. Fold the card inwards along these lines.

Bat card tutorial

Step 7
Lay the card you've just folded down in front of you with the folded over parts sticking upwards. Spread some glue onto the bottom 2cm of a strip of the acetate with a bat stuck on top - make sure the glue in on the front of the acetate. Stick this strip to the piece of black card that is flat in front of you. Repeat with the other acetate strips.

Halloween card tutorial

Step 8
Turn the piece of black card over (so that the acetate strips are now underneath) and flatten out the folds so it lays flat. Spread glue along the front of the central 15cm.


Step 9
Tear and pull the cotton wool until it is thin enough to look like fog. Now stick this onto the glue on the black card.


Step 10
Use the star punch on the silver card to make about 9 stars (or however many you want!). If you don't have a star punch you could always cut them out by hand or use star stickers. Glue the stars randomly onto one side of the piece of orange card.

How to make a Halloween bat card


Step 11
Take the strip of black card with the cotton wool glued to it and place it cotton wool side down. Spread glue onto the left hand side up to the first fold line. Line this up with the bottom of the back of the orange card and stick in place. Do the same with the right hand side.

How to make a Halloween bat card
Add caption


Your decoration card is complete! If you'd like to send it as a card just write a message on the back.


You could also try:
  • Add a Halloween greeting onto the orange card with the stars
  • Use glitter paper of glitter glue to make stars
  • Make bats in different sizes
  • Use grey card instead of orange to give an even foggier feel