Showing posts with label baking. Show all posts

Friday, 21 February 2014

Let Me Introduce You To....

Aprons are (another) of the items that I have more of than anyone would every possibly need. There's something about a pretty apron that I just can't resist. I think it's to do with them being a bit like a costume that you can put on and transform yourself into a character in a world where baking cakes is all you have to do! And I think that's why the more ornate and decorative an apron, the more I like it - which lead me to this week's post.

This post is in no way sponsored or influenced. All opinions are my own and any quotes are taken directly from the people I'm writing about. Please note all images are copyright protected by Creative Chics, I have their permission to use them but please don't copy them.

This week I'd like to introduce you to...


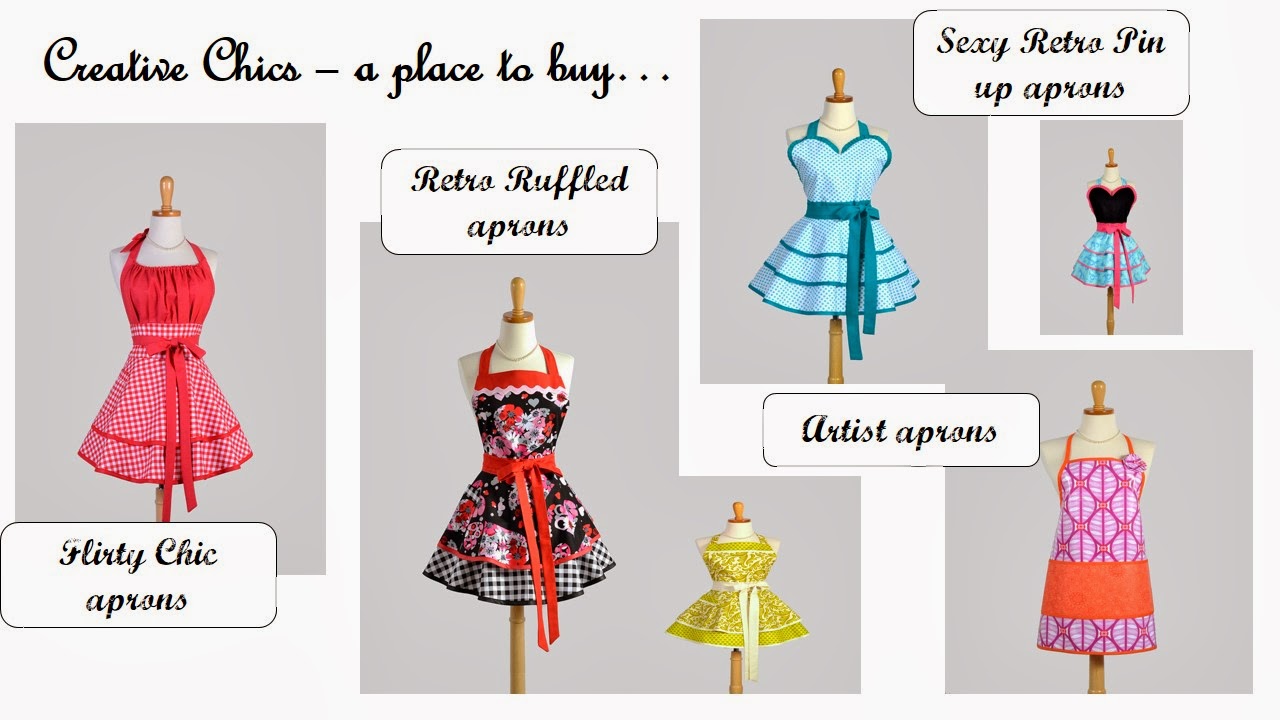
Creative Chics are indeed a group of creative women who have pooled their creativity to create fabulous aprons. They base their designs on vintage styles and add modern twists of colours and fabrics. I love looking through their shop at all the different style aprons and daydreaming about what type of person would wear them and what their kitchen would be like!

The Chics started as Debbie and her mum Freda (or 'mom'! They are from the USA!) and as they were 'struggling to keep up with demand' they invited three other family members and friends to join them. All the women  'have very different taste in fabrics and colors' and use these differences along with their shared passion to create an interesting range of styles and looks.


Aprons by Creative Chics... chosen by Pink Flamingo Handcrafting

Like many creative businesses, Creative Chics started as a hobby, and as with many hobbies the best way to support it was to turn it into a business. This also meant there were lots of excuses to make aprons to satisfy their 'insatiable appetite for collecting beautiful fabrics'. Starting as a hobby also means a great deal of enthusiasm as it's a skill you truly love using and this clearly comes across in the fun designs too. The Chics are 'like children, excited to get out of bed every morning' ready to put their 'creative ideas together' and this clearly shines through in the range of different styles and colours.

Anyone who's read any sewing related posts on my blog before will know that I'm not a natural when it comes to using a needle and thread - and no matter how many times sewing machines are explained to me, I still don't understand them! I have attempted making my own (half) apron before which was okay but knowing how much work that took me makes me admire the work of the Creative Chics even more; not only do they have great creative vision and an eye for fabrics, they are also talented enough to put it all together!


Find out more about Creative Chics

Visit their Etsy shop
Find them on Facebook
Follow them on Twitter


Sunday, 2 February 2014

Quick and Simple Valentine Cupcake Toppers

In the run up to Halloween last year I wrote a tutorial showing how to make some cupcake toppers for the occasion which proved to be the most viewed post of the year. So with another holiday coming up I thought it would be good to use the same method with different shapes (unless of course bats and mummies are romantic for you!).

Here then are some quick and simple Valentine's Day cupcake toppers. They're fun to play around with trying different colours and patterns too; try using old books or music sheets of your loved one's favourites.

Valentine Cupcake Toppers

Valentine cupcake topper tutorials by Pink Flamingo Handcrafting


You will need:

  • various papers
  • glue (I prefer PVA)
  • cocktail sticks
  • scissors
  • pencil
  • ruler
  • black pen
how to make valentine cupcake toppers

These are the shapes I've used. If you want you could print this image and use them as templates or draw your own.

Valentine templates

Step one

Draw the shape/s you want onto the reverse of one of the papers you've chosen. You will need to draw 2 shapes for each topper you want to make.

Make your own Valentine cupcake toppers

Step two

Use your scissors to cut out the shapes. Place the pairs of shapes 'wrong side' to 'wrong side' and make sure they match up. If one is a little bigger or a different shape just cut around them to make sure they match.

Valentine craft idea

If you're making the lips or roses use a black pen to draw the details on now before you make the topper. Follow the lines in this picture.

Valentine craft idea by Pink Flamingo Handcrafting

Step three

Place one shape down flat with the 'wrong side' facing upwards. Spread a thin layer of glue all over the shape.

Heart cupcake topper tutorial by Pink Flamingo Handcrafting


Step four

Place a cocktail stick in the centre of the shape (about half way up) with the remainder of the stick coming straight down.

Valentine paper craft tutorial

Step 5

Take the other shape in the pair and spread a layer of glue over the 'wrong side'.

Heart cupcake toppers paper craft tutorial

Step 6

Line up the two shapes glued side to glued side and press them together. (This is where a wet glue like PVA is useful as you can move the shapes around a little to line them up).

Heart cupcake topper tutorial

And there you have it, a finished cupcake topper! Repeat the steps for as many toppers as you want to make.

Sunday, 6 October 2013

Quick and Simple Halloween Cupcake Topper Tutorial

Halloween is fast approaching and parties are being planned. And with that in mind I've created these easy to make cupcake toppers just for the occasion! Make a mix of plump orange pumpkins, bandage wrapped mummies and flying bats to decorate your party table - or just to amuse yourself on some cupcakes you've made.

How to make Halloween cupcake toppers

Take care if you're making these with young children as there are small parts and pointy cocktail sticks. Always supervise children when they are eating cupcakes with these toppers in.

You Will Need

How much of each depends on how many toppers you want to make:
  • Thin card or thick paper in white, orange, black and brown
  • A circle punch or a coin to draw around (I use a 1 inch punch)
  • A black pen
  • A pencil
  • Scissors
  • Cocktail sticks
  • A wet glue such as PVA

Pumpkin Cupcake Topper

Halloween cupcake toppers tutorial

1. Use the circle punch (or draw around a coin) on the orange paper to make two circles.

2. Cut a little piece off the top and bottom of each circle so they look more pumpkin shaped.

3. Use the black pen to draw lines down each pumpkin. Make the lines at the side curved to make it look rounder. Cut two small stems out of the brown paper.

4. Spread glue on the back of one of the pumpkins. Spread it thinner around the edges (so it doesn't splurge out in the next step) and add more in the middle. Place a cocktail stick in the centre of the glue.

5. Now press the other pumpkin (lined side facing out) onto the glue to make a double sided topper. Spread glue onto one of the brown stems and stick it to the top of the pumpkin on one side. Making sure the stems will fit together, spread glue on one side of the other stem and fix it to the other side of the pumpkin.


Bat Cupcake Topper

How to make cupcake toppers

1. Use the hole punch (or draw round a coin) on the black paper to make 2 circles. Cut out two bat wing shapes following the shape in the pictures.

2. Put a little bit of glue on the tip of one wing and stick it onto the left edge of one of the black circles. Do the same with the other wing sticking it across the circle on the right hand side.

3. Spread glue over the back of the black circle. Put more in the middle to help secure the cocktail stick and less around the edges so it doesn't splurge out in the next step. Put the cocktail stick in the middle of the circle.

4. Press the other black circle over the glue to finish the bat cupcake topper.


Mummy Cupcake Topper

Halloween cupcake toppers
1. Use the hole punch (or draw round a coin) on the white paper to make two circles.

2. Use a black pen to draw two black circles for eyes on one of the white circles. Add some lines to make them look like bandages. On the other white circle (which will be the back of the head) just draw some lines for bandages.

3. Spread glue on the the reverse of the circle without the eyes. Put more glue in the middle to help secure the cocktail stick in place and less glue at the edges (so it doesn't splurge out in the next step). Place the cocktail stick in the middle of the circle.

4. Now press down the circle with the eyes onto the glued circle. Make sure it's the right way up!


Now all I have to do is get baking!

Monday, 9 September 2013

Chocolate and Peanut Butter Cookies - 2 Recipes

If you read my blog on Saturday you will have seen the beautiful retro inspired aprons by Rosie Ann. Writing and looking at that post got me in the baking mood - and was a great excuse to choose one of my many aprons to wear! My first thought was the best combination ever - chocolate and peanut butter.


A selection of aprons


I have a recipe I usually use to make chocolate chip and peanut butter cookies I got from an American cookbook. It says to use peanut butter chips (which I'd never heard of!) so I substituted them for chocolate chips - and the result is heavenly! I got a craving for them over the weekend so thought I'd treat myself to some and got all ready to bake them - then discovered I didn't have any peanut butter. However, I did have some peanut butter flavouring I bought from Make or Bake's stall at a farmer's market I attended last month so thought I'd try a chocolate chip cookie recipe with this flavouring. Below are both recipes (if you need an excuse to try both!); the pictures are from the recipe with peanut butter flavouring.


chocolate chip and peanut butter cookies recipe


Chocolate chip cookies with peanut butter flavouring

Ingredients

75g butter (I use butter substitute)
75g brown sugar
1 egg
A few drops of peanut butter flavouring oil
150g plain flour
Pinch of salt
3/4 tsp baking powder
100g chocolate chips (I prefer dark chocolate)

peanut butter flavouring
The peanut butter flavouring I tried in my recipe


1. Heat the oven to 160 C / 350 F. Mix together the butter and sugar until they are creamy.

2. Beat in the egg. Add the peanut butter oil - I used 5 drops which gave a subtle flavour but add more if you like it more peanutty.

3. Mix together the flour, salt and baking powder. Add this in 3 stages to the butter mixture stirring in well each time.

4. Stir in the chocolate chips.

chocolate and peanut butter recipe


5. Put spoonfuls of the mixture onto a baking tray lined with greaseproof paper. I stretched my mixture to 11 cookies. Leave space in between each cookie for them to spread.

peanut butter and chocolate cookie recipe


6. Bake in the oven for 10 - 15 minutes until they start going golden brown but are still soft. They will firm up as the cool.

7. When they are a little firmer transfer them from the tray to a cooling rack to cool completely.


Chocolate chip and peanut butter cookies recipe

Tip - to make them extra chocolatey substitute 40g of the plain flour for cocoa or drinking chocolate!

Chocolate and peanut butter cookies

These are the cookies I usually make when I haven't run out of peanut butter.

Ingredients

1/2 cup of plain flour
1/2 teaspoon of baking powder
A pinch of salt
1/4 cup of butter (I always use butter substitute rather than the real thing and it always tastes good)
1/2 cup of peanut butter (I prefer chunky)
3/4 cup of brown sugar
1/2 an egg
A little milk (if needed)
1/2 cup chocolate chips

1. Heat the oven to 160C/350F.

2. Mix together the flour, baking powder and salt in a bowl.

3. In another bowl mix the butter, peanut butter and brown sugar. I use an electric whisk or you can do it by  hand.

4.  Add the egg and beat it into the mixture.

5. Pour the flour mixture into the peanut butter mixture and mix until combined. If the mix is too stiff at this point add a little milk. The mixture should be firm but sticky.

6. Stir in the chocolate chips.

7. Line a baking tray with grease proof paper. Drop tablespoons of the mixture onto the tray and flatten it a little. Leave space between each drop of mixture because the cookies will spread as they cook.

8. Bake for 10 - 15 minutes. They should look brown and starting to set. Take them out of the oven while they are still squidgy though as they will firm up as they cool.

9. Let them cool on the tray until they are firm enough to be picked up and then put them on a cooling rack to cool completely (or if you're like me eat a couple while they're still warm and melting!).

Wednesday, 28 August 2013

Plum Crumble - Seasonal Recipe

When I was little the August Bank Holiday (that's just been on Monday) seemed to mark the end of summer. It was usually the weekend we'd come back from the family holiday and it was only a few days until the start of the new school year. Although it was sad that summer was over, it also meant that autumn was on its way with lots of treats of its own! One of my favourites was (and still is) fruit crumbles. In our back garden we had an apple tree that was starting to fruit and meant lots of lovely tasty treats, but it was a little unreliable and only seemed to share its apples every other year! However, we also had a plum tree which fruited every year and made lovely crumbles of its own.

While out shopping yesterday I spotted some juicy orangy-red plums which are right in the middle of their best season here in the UK. Well, that meant only one thing on my mind - plum crumble! So last night I made one for dessert and here I share the recipe with you.

plums

Plum Crumble Recipe

You will need:
  • 6 large plums
  • 175g plain flour
  • 1tsp baking powder
  • 90g butter
  • 90g brown sugar   
  • Optional - cinnamon, nutmeg, crushed nuts or oats for the topping
  • A baking dish (I used one that was 20cm round)
Serves 4-6 people (depending on how greedy you are! I divided mine into 4 generous portions -because I am greedy...)

Step 1
Turn the oven on and set it to 170C/ 350F. Let it heat up while you prepare the crumble.

Step2
Wash and slice the plums. Arrange them in the bottom of the dish.

Plum crumble recipe

Step 3
In a bowl mix together the flour and baking powder. Add pieces of butter and rub it into the flour with your finger tips until it sticks together and looks like crumbs.

Crumble topping recipe

Step 4
Use a fork to mix the brown sugar into the flour and butter mixture.

Step 5
Now tip the flour mixture over the top of the fruit in the dish. Pat it down so the mixture covers all the fruit and goes up to the sides of the dish. (The fruit will bubble up as it cooks so this helps to seal it in).

If you want to add any additional toppings, now's the time. I sprinkled mine with a little nutmeg. Cinnamon, crushed nuts and oats also go well either on their own or all mixed together. 

How to make plum crumble

Step 6
Put the crumble into the pre-heated oven and bake for 40 minutes until the top is light golden brown and the fruit is starting to bubble through. If the topping looks like it's getting too brown, cover the dish with foil until the fruit is cooked.

Plum crumble recipe

This recipe can be made with any soft fruit you have. Some of my favourites are apple, blackberries or rhubarb.

Wednesday, 7 August 2013

A Unique Local Shopping Experience

Tapton Hall Farmers and Craft Market

Tuesday was a different day for me - a fair on a weekday.  Usually I'm a weekend stall holder in and around Sheffield which makes a lot of sense as people are off work more and in the shopping mood.  However, I thought I'd give it a go and I discovered some lovely local producers, crafters and customers.

After setting up my stall I had a wander around to see what was on offer and have a chat with the other stall holders. And as usual spend money before I made any!

First I discovered Make or Bake selling an array of baking goods. A whole rainbow (and more) of glitters and bun cases drew me in and then I noticed the champagne and the peanut butter flavourings - two of my favourites! I could have bought quite a lot here - put a showed restraint with just a couple of treats (and an early Christmas present purchase).

Make Or Bake

Next I had a chat with Janet of Home Grown Designs who makes beautiful cushions, bags, door stops and other textile products. She reworks discarded fabrics from clothes and sample books to create her work - an idea that I love and have in my own work too with paper.  I bought a pin cushion filled with fine sand which helps to sharpen the pins and needles (I always seem to blunt mine somehow!) as you use it and is also very helpful to use as a weight when crafting.

Home Grown Designs


Hollow Meadows Flowers was a stall I'd seen before at a similar market in Hillsborough where I'd admired the wild flowers and country garden look. I had a chat with Rachel whose stall it was and she told me about the more natural and unstructured look of her flowers which she grows herself. I even treated my mum to a bunch!
Hollow Meadows Flowers


My attention was then caught by Sweet Thing - it was a stall full of cupcakes after all! There was a whole selection of delicious looking cakes; the chocolate ones looked particularly appetising (and tasted just as good as they looked).

Sweet Thing

Their neighbour offered Nibble Nose cheeses, bread and cakes. I very much enjoyed sampling the handmade cheeses and couldn't resist a tasty caramelised onion cheddar which somehow made its way home with me...
Nibble Nose cheese

And finally I had a chat with Roy at The Olive Tree Soap Co.  He makes a tempting range of soaps using olive oil and all natural ingredients using the cold pressed method which takes 8 weeks to make it rich and lathering. This means that no additives are needed in it so it's much kinder to skin. There was a lovely range of gorgeous scents and I had trouble choosing but finally bought some olive oil soap for myself.  One other intriguing scent was choco and beer which I got as a little gift for a friend.

The Olive Tree Soap Co


Well, I thought it was finally until I learned about the stuffed vines leaves offered by The King Olive, a tempting stall with a variety of olives, stuffed peppers, homemade baklava and Turkish delight as well as the delicious stuffed vine leaves which ended up as my lunch (and were eaten before I got chance to take a photo!).

There was also my stall there with my usual range of upcycled and handcrafted cards, gift wrap and jewellery.

Pink Flamingo Handcrafting Tapton Farmers Market

So, an unusual prospect turned into a very enjoyable day finding lots of Sheffield's unique gems on a weekday.

Another market takes place on September 3rd and on the first Tuesday of every month at Tapton Hall, Shore Lane, Sheffield. Although it's only a small, local market, there are lots of wonderful things to discover.

All the stall holders do regular fairs in and around Sheffield too so there are plenty of places to discover them for yourself if you can't make it on a Tuesday.